Tuesday, February 26, 2013

Zeroing Your Cutter and Spindle - Step by Step Guide

What a great time - the first The Tim & Tom Show was a lot of fun. We had some fantastic questions from the live audience and are looking forward to our next show on Wednesday, March 13th!

One question that we got a lot of feedback on was "How to zero your cutter." So, here's a step-by-step guide to zeroing your cutter on any of our Gravograph Rotary Engraving Systems.

Before You Begin:
This step by step will show you how to reset your cutter and depth nose for engraving plastic and metal material. Properly setting the cutter will provide a consistent engraving depth throughout the material and give your chip collection system increased ability to remove debris from the engraving area. Properly setting your cutter can reduce the risk of breaking the cutter tip by not allowing it to drill too deep. 

Q: When should I reset my cutter?
A: You should reset the cutter when the cutter is being changed or if you experience inconsistent or incorrect depth.

This procedure can be performed on any Gravograph rotary engraver using any conical (V-shaped) tip, diamond cutter or burnisher.

You will need: Cutter, 2mm Allen driver or cutter wrench spline (depending which machine you own).

Step-By-Step Instructions (Plastic)
Note: Steps 1-6 are for using V-shaped cutters used for engraving plastic or wood.
1. If you own a GTM-series machine, use the 2mm Allen key to loosen set screw and remove cutter. If you own and IS-series or Vanguard-series engraver, use cutter wrench spline to loosen set screw on gold cutter button to remove cutter.
2. Screw micrometer all the way up then unscrew three full turns to the nearest zero. (See picture in step 3).
3. Use arrow buttons on machine to move spindle over material. Press Z then down to lower nose cone to the material until it touches.
4. Insert cutter through the top of the spindle and gently lower it all the way until you feel it touch the bottom. Tighten set screw to secure cutter.
5. Press Check.
6. Use micrometer to dial in desired depth, thus exposing the tip.

Step-By-Step Instructions (Metal)
Note: Steps 7-10 are for using diamond cutters or burnishers for engraving on metal.
7. If you own a GTM-series machine, use the 2mm Allen key to loosen set screw and remove cutter. If you own and IS-series or Vanguard-series engraver, use cutter wrench spline to loosen set screw on gold cutter button to remove cutter.
8. Screw micrometer all the way up then unscrew three full turns to the nearest zero.
9. Insert cutter through the top of the spindle and gently lower it until the cutter protrudes from the nose cone approximately ¼ inch.
Note: If getting inconsistent engraving, check that the cutter is held tightly. Also check if tip is dull and needs to be changed.

And that's it! Want more tips? Make sure to follow this this blog and subscribe to our YouTube Page!


Monday, February 18, 2013

How to maintain your 11/64 rotary spindle

Just two more days until The premiere of The Tim & Tom Show - our new LIVE Tech Help WebSeries!

Since we'll be discussing tips and tricks for the IS400, we've gotten a few requests on how to properly maintain a 11/64 rotary spindle. You ask. We give. See all the info below!

Before You Begin:
Here's how to perform maintenance on your engraver’s 11/64 standard spindle. Properly maintaining the spindle will allow it to properly ‘float’, giving more accurate spindle tension onto the engraving surface.

What You Will Need: 
For maintenance, you'll need a 2mm or 3mm Allen driver (depending on type of machine), ring clip pliers, a clean, damp cloth or paper towel and light weight general purpose lubricant (DO NOT USE WD-40).

Step-By-Step Instructions:
1. Using 2mm or 3mm Allen driver, loosen the two screws that secure the spindle in place and remove the spindle from the machine.
2. Using the ring clip pliers, remove the C-clip at the top of the spindle and set aside. DO NOT lose or misplace the C-clip.
3. Slide off the outer barrel and tension spring from the spindle and unscrew the tension adjust knob from the outer barrel.
4. Using a clean, damp cloth or paper towel, wipe clean the inner shaft, tension spring, inside of the outer barrel and the threading for the tension adjust barrel. Then apply a few drops of general purpose or machine oil to the inner shaft and spread into a very thin layer.
Note: If inner shaft contains rust you can gently clean it using a small amount of oil and lightly rubbing with a Scotch Bright pad.
5. Screw the tension adjust barrel back onto the outer barrel. Slide the tension spring onto inner shaft then slide on the outer barrel lining up the gold pin to the slot cutout into the bottom of the outer barrel. Then reattach the C-clip.
Note: Using a chip collection system will prevent scratching of the material and debris from entering components of the spindle resulting in less maintenance.

And that's it! Want more helps? Make sure to subscribe to this blog AND to tune-in to Tim & Tom Show!

Thursday, February 14, 2013

How to vectorize an image & create outlines for engraving


We're starting to get excited about the upcoming premiere of The Tim & Tom Show! It's our new LIVE Tech Help WebSeries!

The whole purpose of the show is to give you the knowledge and how-tos you need to make sure your machine is running at it's best... and show you some neat software tricks along the way.

One of the most common questions Tim & Tom have received so far: How do I vectorize an image so I can engrave it?

You asked. We answer. See all the info you need below. And make sure to tune-in to The Tim & Tom Show for more great tips!

Before You Begin
Vectorizing is the act of converting or outlining an image into a vector format. The fundamental purpose of vectorizing an image is to create a file composed of lines (or plot coordinates) that your rotary engraver understands. Unlike laser engravers, rotary machines do not recognize image files. Vectorizing also gives better control over fill patterns within parts of, or the entire design. In this article, we discuss the basics of vectorizing an image file.

Files that require vectorization include: JPEG, BMP, DIB WMF, PNG, GIF, TIFF & PDF. Some files that do not require this step include, but not limited to: DXF, HPGL, EPS, EJO, LGO & older GravoStyle™ formats. Note: The below is done with our GravoStyle™ software.

Step-By-Step Instructions
1. Start a new job and input your material size.
2. Click on the Selection mode icon. This disables Text mode.
Selection mode icon
3. Click on File>Import on the upper-left.

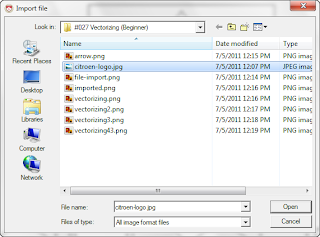
4. Now, browse for and select image you wish to use. Click Open. For this example we will use citroen-logo.jpg.
File Open
5. Once imported, make sure the image on the screen is highlighted (it will have 9 red squares, or handles, around it). Then resize image (if needed).
6. Click on the Vectorize Bitmap icon.
7. On the Vectorize Image screen, you can adjust some basic settings, these include Allowance, Noise filtering & Smoothing (Curve/Angle). Once completed click OK.
Allowance – Precision of contour line up to 1/10th pixel.
Noise filtering – Deletion or ignoring of interference pixels.
Smoothing – Vectorization bias using curves or angles.
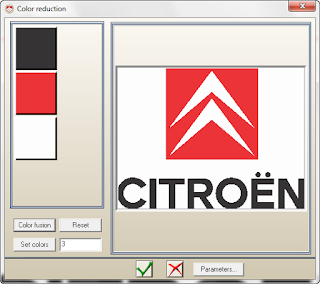
8. The Color reduction opens. On this window you can select the colors you wish to outline. By choosing a color, the software will trace a line along that edge. You can choose to vectorize any number or combination of colors available on this window. For this example, select both the black and red colors (hold the Ctrl key to make multiple selections) Click Check. You can also select multiple colors and click Color fusion to combine all non-selected colors.

Color reduction
TIP: By selecting the background color, this will create an outline of the negative image creating a bounding box. You can vectorize both positive and negative images at the same time. You can choose this if you so wish.

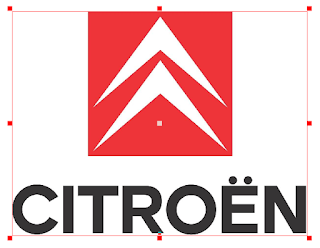
9. You will now have two images overlapping; one is the original image before it was vectorized and the other is the outlined version.
Overlapping images
10. You can delete the original if you wish or move it because it cannot be engraved.
11. Once you are left with only the vectorized image you can engrave this as is or perform clean-up (if needed).

Now that you’ve learned the basics, watch for future articles on more advanced vectorizing features!

Please note that the vectorization feature requires GravoStyle™ Discovery Max level or greater. For questions regarding vectorizing contact our Technical Support department at 800.843.7637 (option 4), or for upgrade information please contact your local Gravograph Sales Representative.

Tuesday, February 12, 2013

The Tim & Tom Show - LIVE Tech Help WebSeries!

TheTim&TomShow

We're proud to announce our new LIVE Tech Help WebSeries! - The Tim & Tom Show!
Every month Tim & Tom will focus on one of Gravograph’s engraving machines (From  laser to rotary). They’ll walk you through simple helps, fixes, and give little tid-bits of Sage Engraving Advice. And since the show is live, you can ask help questions to Tim & Tom!
So, what do you need to do?
1. Check out The Tim & Tom Show landing page for series/machine schedule.
2. Make sure to watch the Promo Video.
3. Then sign-up here for the February webinar!
Our next show will be Wednesday, March 13, at 2:00 PM EST. Tim & Tom will be focusing on the IS400
We're excited to give you live help and machine advice! See you Wednesday, Feb 20th!

Friday, February 8, 2013

How to choose a premium engraving plastic

We're all about engraving plastics here at Gravograph. Since our post about how we're growing our engraving plastics manufacturing facilities, we've had a lot of customers ask us what to look for when choosing an engraving plastic. 

We heard your question. And we're excited about announcing our new web series that focuses just on materials. 

Here's the first video in the Materials With Pete web series:


Top 3 things to look for in a premium engraving plastic:
1. Flatness
2. Consistency of cap & core
3. Consistant color

Make sure to subscribe to Gravograph's YouTube Channel for all the latest rotary and laser engraving videos and tutorials!

Friday, February 1, 2013

We’re ready for service.

Engraving Machine Training_1
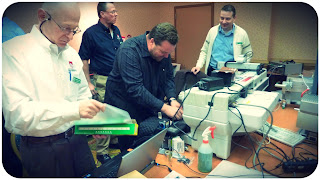
This last January, Gravograph hosted a national conference for all of our Field Technicians at our home office in Duluth, GA.  From Canada to Florida, each tech shared knowledge, tips, and fixes from their combined 100+ years’ of technical/repair experience. The entire Gravograph laser/rotary marking portfolio was covered. 

While they were here, a round-table of ideas was held on how to help you, the customer. Three new items that will be coming very soon:

1. Live monthly technical help seminars.
2. YouTube troubleshooting series.
3. Enhanced warranty renewal programs.

Our goal: Make sure that your engraving machines are working and performing to their maximum ability. Look for more info about the above in the next few weeks. Stay tuned – more great things coming soon.

In the meantime, if you have any questions, reach out to our Technical Service. They'd love to hear from you. 

Engraving Machine Training_2